
In this 5 part series I will be talking about the Synapse Minimal Test Framework. The why, how and whatnot:
- Part 1: Let’s get testing – Introduction, considerations, and approach
- Part 2: Simple pipeline test – Testing a simple unzip pipeline using Storage
- Part 3: Advanced pipeline test – Testing a complex pipeline using SQL
- Part 4: CI with Github – Automate testing using Github Actions
- Part 5: CI with Azure DevOps – Automate testing using Azure DevOps Pipelines
Want to dive straight into the code?
Want to skip reading? All code below can be found on GitHub: jpaarhuis/synapse-minimal-test-framework: Minimal test framework to test Azure Synapse pipelines with MSTest (CI included) (github.com)
Automate testing using Github Actions
In the previous post, we discussed how to use GitHub Actions to automate testing on GitHub. In this post, we will explore how to use Azure DevOps Pipelines to automate testing on Azure DevOps.
In this blog post, we will explain the workflow for running tests on Azure DevOps and generating a test report.
Azure DevOps Pipeline for Running Tests
To run tests on code changes to the main branch, we’ll create a YAML file that defines the pipeline’s structure and specifies the actions to be taken. The pipeline will run the defined tasks and provide feedback on the results when the trigger event occurs.
Here is the YAML code for our Azure DevOps Pipeline:
name: Run Tests

trigger:
  branches:
    include:
      - main
  paths:
    include:
      - /test/*

steps:
  - task: UseDotNet@2
    inputs:
      version: '6.x'

  - task: AzureCLI@1
    displayName: 'Run Tests'
    inputs:
      azureSubscription: '[ServiceConnectionHere]'
      scriptLocation: 'inlineScript'
      inlineScript: 'dotnet test --configuration Release --logger trx'
    env:
      AzureServicesAuthConnectionString: RunAs=Developer;DeveloperTool=AzureCli

  - task: PublishTestResults@2
    inputs:
      testRunner: VSTest
      testResultsFiles: '**/*.trx'
Let’s go through this code section by section.
Trigger
The trigger section specifies when our pipeline should be triggered. In this case, the pipeline is triggered when code is pushed to the repository’s main branch and when changes are made to files in the “/test/*” directory.
Steps
The “steps” section contains the set of actions that will be taken in our pipeline. In this case, we have the following steps:
UseDotNet Task
The first step is to use the “UseDotNet” task to set up the environment for .NET Core. We specify the version of .NET Core we want to use as “6.x”.
  - task: UseDotNet@2
    inputs:
      version: '6.x'
AzureCLI Task
The second step is to use the “AzureCLI” task to run the tests. We specify the Azure service connection to use and run the command “dotnet test –configuration Release –logger trx” to execute the tests and create a TRX file as the test results.
The “AzureServicesAuthConnectionString” environment variable does a lot of heavy lifting here, because it enables the MSTest project to run under the credentials of the service connection service principal. So make sure the service principal has the corresponding permissions on Azure Synapse and the Azure Storage Accounts.
  - task: AzureCLI@1
    displayName: 'Run Tests'
    inputs:
      azureSubscription: '[ServiceConnectionHere]'
      scriptLocation: 'inlineScript'
      inlineScript: 'dotnet test --configuration Release --logger trx'
    env:
      AzureServicesAuthConnectionString: RunAs=Developer;DeveloperTool=AzureCli
PublishTestResults Task
Finally, the last step is to use the “PublishTestResults” task to publish the test results. We specify that we are using the VSTest runner and to look for TRX files in any directory with a “.trx” extension.
- name: Setup .NET 6.x
  uses: actions/setup-dotnet@v3
  with:
    dotnet-version: '6.x'
Result
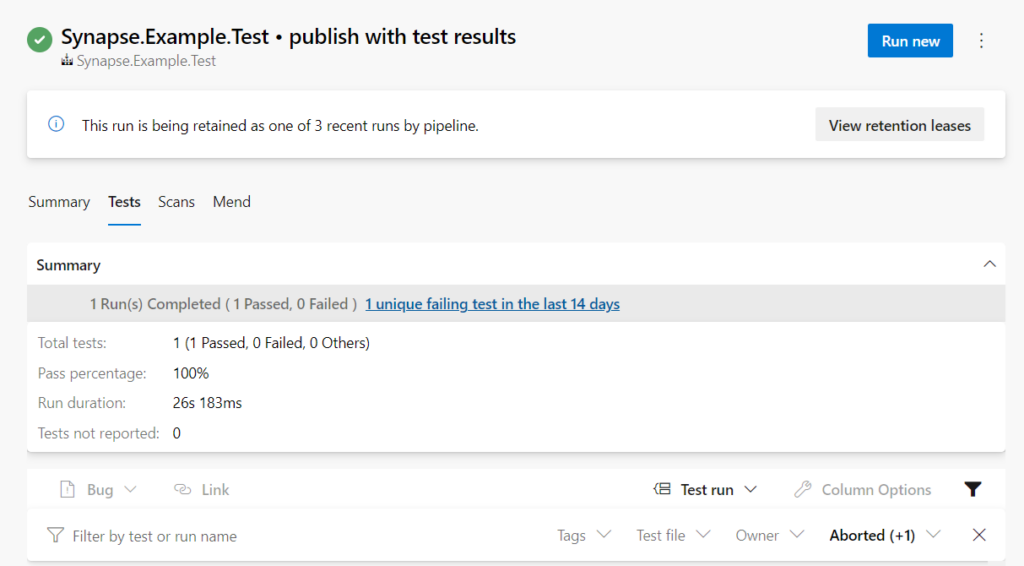
When everything is working correctly, and all tests succeed you will see a test report when running the pipeline.
Conclusion
In this blog post, we explained how to use Azure DevOps Pipelines to automate testing on Azure DevOps, which sums up the series.
In this series, we covered the basics of testing Synapse Pipelines and provided examples of how to test simple and complex pipelines using different technologies. We also showed how to automate testing using CI tools such as Github Actions and Azure DevOps Pipelines. By incorporating testing into your pipeline development process, you can ensure that your pipelines are reliable, efficient, and accurate.
Leave a Reply
You must be logged in to post a comment.